For the last couple of weeks I’ve been publishing articles here on the Design Range all focused around contracts. I know what you’re thinking, and you’re right – it has been thrilling. Genuinely though – I think in these last couple of weeks I’ve put out some really useful content, so make sure you take a peek if you haven’t already.
In the first article I went over all the reasons you need to have a contract and offered some perspective to those out there who think they can get by without any at all.
Last week I gave a step by step guide on how to actually write a contract for yourself, which has proved very handy to designers out there who might have been put off by cost or a general lack of knowledge.
However, with all good things it must come to end, and so here is the last of the three articles. In this one I’m going to go over how you can actually start implementing the use of contracts on your own personal website.
Now any of you that are regulars to the Design Range will know – I don’t write step by step technical articles like this a lot, if ever. I figure you’re all professionals who do this kind of stuff for a living already, and the last thing I want to do is to try and teach you to suck eggs (whatever that means).
That being said – for you web designer gurus out there – there’s probably a lot of stuff here you can skip over here or possibly even know a better way of doing, so I’ll do my best to keep the bullet points clear and then provide details for anyone else out there that might need them.
Now before we get into the nitty-gritty, lets get a few things straight here. I know I mentioned this in my first article, but for any of you who missed it; all a contract is, is a declaration of intent. So long as it proves that two (or more) parties agree to do something for each other (usually work and payment) then it’s a contract.
That being said – it does need to be written on parchment that has been blessed by a priest, and the ink it’s written in needs to contain the blood of a virgin. On top of that it needs to be rolled into a scroll and sealed using red wax and then stamped by your personal signet ring (with your family crest on). Also you’ll need to have it delivered by a trained dove.
Obviously, I’m shitting with you, but the point I’m trying to make is that contracts really don’t have to these mystical physical documents with holographic logos we see in movies.
In fact they don’t have to be physical at all.
They don’t even have to be signed!
Think about this for a second – say you want to sign up for Netflicks, or Spotify, or a new phone, or something like that. Something that you could (or in some cases would have to) sign up for online. You pop in all your details and click the link saying you agree to their terms and conditions and boom; off you go.
They’ve agreed to provide a service and you’ve agreed to pay them. That’s a contract.
We don’t often think of it that way, but that’s what it is, and it’s just as legally binding as if they had send that dove with the mystic scroll.
Now I don’t know about you, but I don’t ever get to actually meet a lot of my clients. A few don’t even live in the same country! If I wanted them to physically sign something, I’d have to print it off – sign it, pay to have it posted, wait for it to arrive, wait for the client to sign it, and then wait for them to pay to post back again.
Digital is simpler, faster, more efficient and every inch as official.
Now this method I’m about to go through could be completed using almost any CMS out there, there’s nothing majorly fancy going on, but for the sake of this article I’m going to be using WordPress as my base CMS, simply because it’s super popular, pretty standard, and it’s what I personally use for my business website. If you use something different, then just adapt as required, it shouldn’t be too tough.
So here’s what you’re going to need to have –
There are ways to do this that are much more streamlined I know, and if you know how to add in the functionality yourself, then there’s no need to bother with the plugins – I’m just going for the most straight forward and easy to follow method. Also – for the last time – I’m not a lawyer, this is me telling you what I do in my business. I live and work in the UK and whilst contract law is really similar between common law countries like the US and Australia, I’d always recommend you do a bit of research of your own before taking my word as gospel.
If you’re following my advice on how to write a contract from last week, then your contract for the most part should be pretty similar from client to client, with only a few of the particulars changing.
With that in mind, we can create a standard contract template that you can select when creating a page. Working this way means that you’ll be able to actually get a contract put together and sent off to a client in minuets rather than hours.
To create a template; open up the file for whatever your standard page design is (usually this is page.php in the WordPress theme folder) and then add in this line at the top:
<?php
/*
Template name: Contract
*/
?>
Then just above where it says <?php the_content() ?> paste in your contract text, making sure you add in the necessary html for paragraphs and stuff like that.
Save it as contract.php in the same folder as your page.php file (making sure you don’t overwrite the page.php file!) and now when you go to create a new page in WordPress, you should have a little drop down menu with your contract template in.

If you’re providing several services that are quite different (photography and web design for example) then you may want to go ahead and create a couple of contract templates as required.
Although we can make our contract pretty standard between clients, there will be bits that need to change every time. Things like the clients name and company, a desciption of the particular project, the price and payment schedule, and of course the date will all need to be editable.
But these things can appear multiple times throughout a contract, so doesn’t it undermine the whole point of having a template if we have to jump in and edit bits every time?
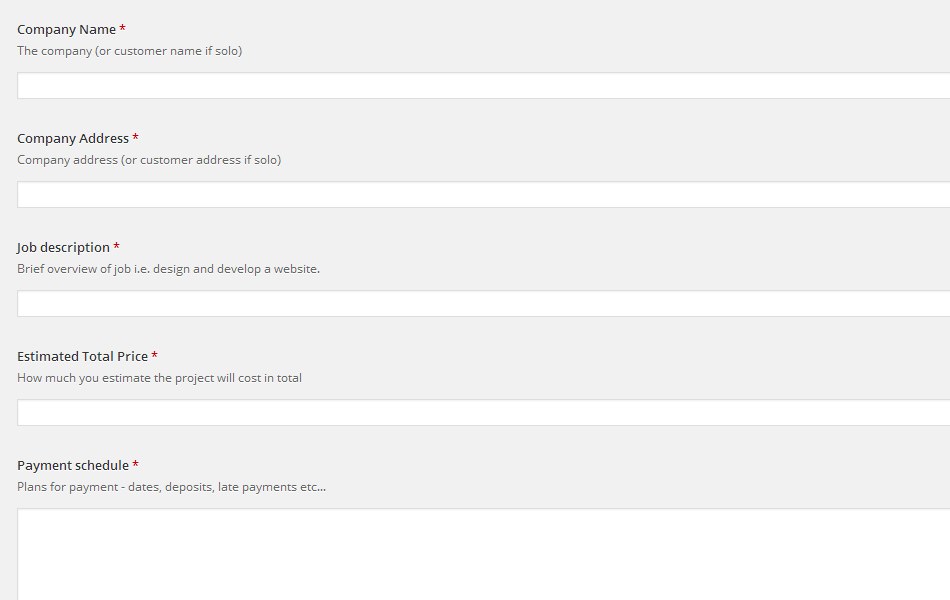
That’s why we need that Advanced Custom Fields plugin. What this program does is give you extra fields for you to fill in when you first create each of your contract pages, allowing you to quickly amend all of these bits of data on the fly.
First off you need to create the new fields themselves. So head to the Custom Fields section within WordPress and click ‘Add New’ to create a new field group.
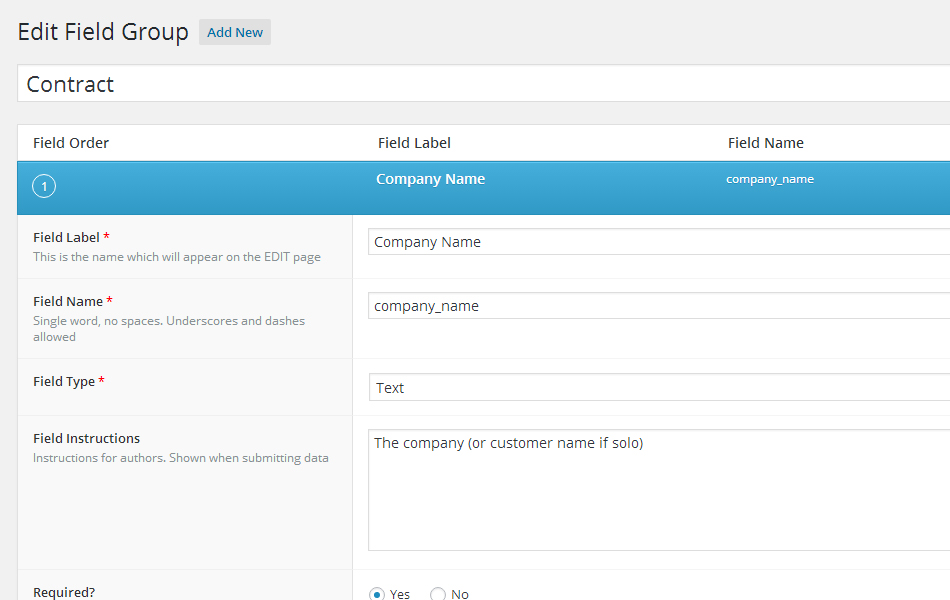
Now just add in fields for every bit of data that you think might change from contract to contract. Add in the field label and the field name (keep these as similar as possible for simplicity – I’ll go into the difference in just a sec) and also the field type (this will just be text or text area in most cases).

When you’re done, take a look at the location box at the bottom of the Field Group page and edit the drop down boxes to read; Show this field group if Page Template is equal to Contract. This means that this new field option will only appear in the WordPress page editor once you’ve defined it as using the Contract template we made before.

But we’re only halfway there. We now need to go back to the template and tell it where to put this new information. This is where we get into that business with field names vs field labels. A field label is how the field is displayed in the WordPress page editor (in this case we’ll use Company Name), the field name however is what we use in the code to actually identify where that value appears in the template, so I’ve gone for the easy to remember company_name (I’ve used an underscore as you can’t use spaces in the code).
So wherever you want the company name to appear in your page template you just type this:
<?php the_field(‘company_name’); ?>
To use vales from different fields, just replace the field label with the one you want to use.
There we go, now you website can create contracts in seconds.
Ok, so we’ve got the actual contract done, but that’s not much good on it’s own. What we need now is for the client to be able to agree to it, so this is where we bust out the Contact Form 7 plugin.
What Contact Form 7 does is basically create a series of fields that will appear on the finished page. These are for the client to fill in. They click send and you get a notification by email. You know what a contact form is.
What we’re going to do though is use this functionality to create our digital dotted line.
Now this is pretty similar to what we did in with the Advanced Custom Fields in that we’re going to be slotting in these editable fields within a sentence. What we want as a finished product is something that reads “Signed by Client McClientperson on 01/01/2016” followed by a checkbox saying something like “I understand and agree to the terms and conditions laid out in this contract”.
So the way Contact Form 7 works is that each editable field is written between two square brackets []. Within these brackets we first define what kind of field it is – the fields we’ll be using are text, date, checkbox, email and submit. We also want to add in an asterix * at the end of each of these to denote that it’s a required field, meaning that the contract cannot be submitted until all fields are completed.
Next we name the particular value – again, keep it simple. If it’s the clients name, just call it client_name.
The last little bit you may want to pop in these brackets is a placeholder that’ll tell the client what information they need to put into the field. To do this – just write placeholder and then whatever you want your placeholder to say between quotation marks “”.
So the field for a clients name should look something like:
[text* client_name placeholder “your name”]
And when it’s all done, the full sentence should read:
Signed by [text* client_name placeholder “your name”] on [date* the_date].
[checkbox* client_agreement “I understand and agree to the terms and conditions laid out in this contract.”]
Now a really important bit that you can’t forget is adding in a section for them to place their email; firstly so that they can be emailed a completed copy of the agreement, but also so that you can provide reasonable proof that it was indeed them who agreed to the contract.
Email conversations can quite happily hold up in court as a contract so long as they outline a declaration of intent. So if you have that, plus a copy of a clearly written contract being sent their way that they’ve agreed to, then you’re really sorted.
Finally, when all that’s done, add in the submit button [submit “Submit”] and you’ve created your dotted line.
You’ll also need to jump into the Mail section and design what you want the email that’s sent to you to contain. You can reference any of the sections you’ve used in the form here too simply by including whatever value you gave it between square brackets. So for instance, if you want to use the clients name, you’d just type [client_name] rather than the full lot you used in the form.
Personally I have the email contain a full copy of the contract and I make sure an email is sent to both me and to the client with a copy of everything in.
So the forms all made up, and all we need to do now is have it appear in our contract template. To do that, we just need to copy the bit of code that’s generated in a blue box at the top of the contact form you just created.
Now we could paste this directly into our page template, or create a new field using the Advanced Custom Fields plugin, but we won’t. We’ll place this directly into the main text area when we go to create our page (the bit that you’d usually write your content in) and I’ll tell you why below.
So the contracts done, and the client can sign it, but if we publish this now then won’t it be up on our website for anyone to see?
Well yes and no.
Yes in that anyone with the specific URL of this page will be able to visit the page and view the contract, but unless you have your WordPress set up to add a link to any new pages in the main menu, or to post announcements about new pages to your Twitter feed or Facebook group then chances are nobody but the client (who you’ll send the URL to) will ever know it’s there.
This openness actually also creates another benefit in that the client is free to forward the contract URL to any legal bods they might know to look it over, or a company could forward it to all the partners to look over.
But then what’s to stop the lawyer or anyone else from signing the contract then? I’m glad you asked.
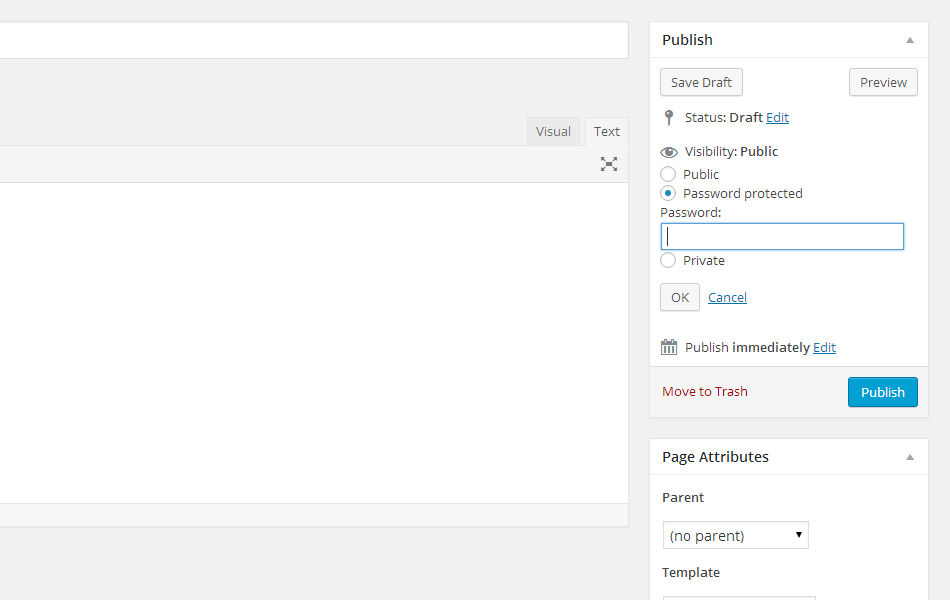
WordPress has a built in option to add password protection to individual pages, all you need to do is before you go to publish the page just click on the part of the Publish box entitled Visibility and select Password Protected, and then add in a password.

What this tells WordPress to do is to hide anything that’s been written in the main text area behind a password.
Now as you’ll recall – the ONLY thing we’ve put in that main text area is the link to contact form we created earlier. What this ultimately means is that when the page is published, the entire contract will be visible (great for people to look over), but the actual section that the client needs to sign is hidden safely behind a password that only they’ll know, meaning that only they actually have access to sign the contract.
Now if someone really went out of their way to find this contract on your site, they might be able to, I won’t say it’s an impossibility. But that’s only the same as how someone could route through your bin to find a copy of a physical contract.
Even then, without the password there’s nothing they could actually do with it.
That being said, a habit that I’ve got into is once the contract has been digitally signed and emailed to both you and the client, I hop back into WordPress and delete the contract page. There’s no need for it to be up there any more, and it negates the chance of anyone somehow stumbling across it in the future.
Yep.
If an email conversation between you and a client can hold up in court as a contract, then this sure as hell should be able to.
I’m not a lawyer. Can I promise you that a $5000 an hour lawyer could find some way around this? No I couldn’t promise that.
Of course I couldn’t.
But all this contract stuff I’ve been telling you isn’t for that really is it? I’ve not written this series for design agencies working on million dollar contracts. They can pay for their own lawyers to write their bloody contracts!
I’ve written all this for you. I’ve written this for the designers out there who aren’t using any contracts at all. For those of you that have thrown up so many reasons why you can’t, that you don’t bother at all. Or maybe you do use a contract, but you find them cumbersome and a pain.
Hopefully you’ve found something in all of this that can help you out a bit, and get rid of any barriers that are in your way.
I really do hope so, because the real benefit of a contract isn’t legal at all. It’s far more important than that.

What’s really the point though, you might be wondering? If the email conversation I naturally have with my clients can constitute a contract anyway, then why would I even need to bother with an individual contract at all?
Let me tell you why; because it’s a net.
It’s a net that’ll catch your clients and make them feel safe and secure with you. It’ll make them feel like they’re working with the true professional that you no doubt are.
But more than that, it’s a net that’ll block out those dick head clients that have no intention of ever paying.
Even if none of this meant anything – even if this entire series on contracts was nothing but smoke and mirrors designed to catch out these clients, it’s be worth it a thousand times over.
All you need to hear is that little line; “do we really need to bother with a contract?” and you know who you’re truly dealing with right away.
When you’ve made it this easy for them?
Yeah – too fucking right we need to bother with a contract.